Overview
Ordinarily, identically stickered pieces on a Rubik’s cube are interchangeable, reducing the solution space of a puzzle and making it easier. The opposite is true on the Trapentrix. The algebraic properties of this puzzle require that all pieces are positioned correctly; identical pieces only serve to obscure the current state of the puzzle. Time might be wasted on guessing and checking placements without a systematic approach.
This solution is optimized to use quick probing and correction sequences, where incorrect placements can be ruled out based on their color signatures.
I opted to solve the two triangular orbits first, then solve the remaining pentagons and edges. This contrasts with Matt Galla’s Solution, which is triangles-last.
Orbits
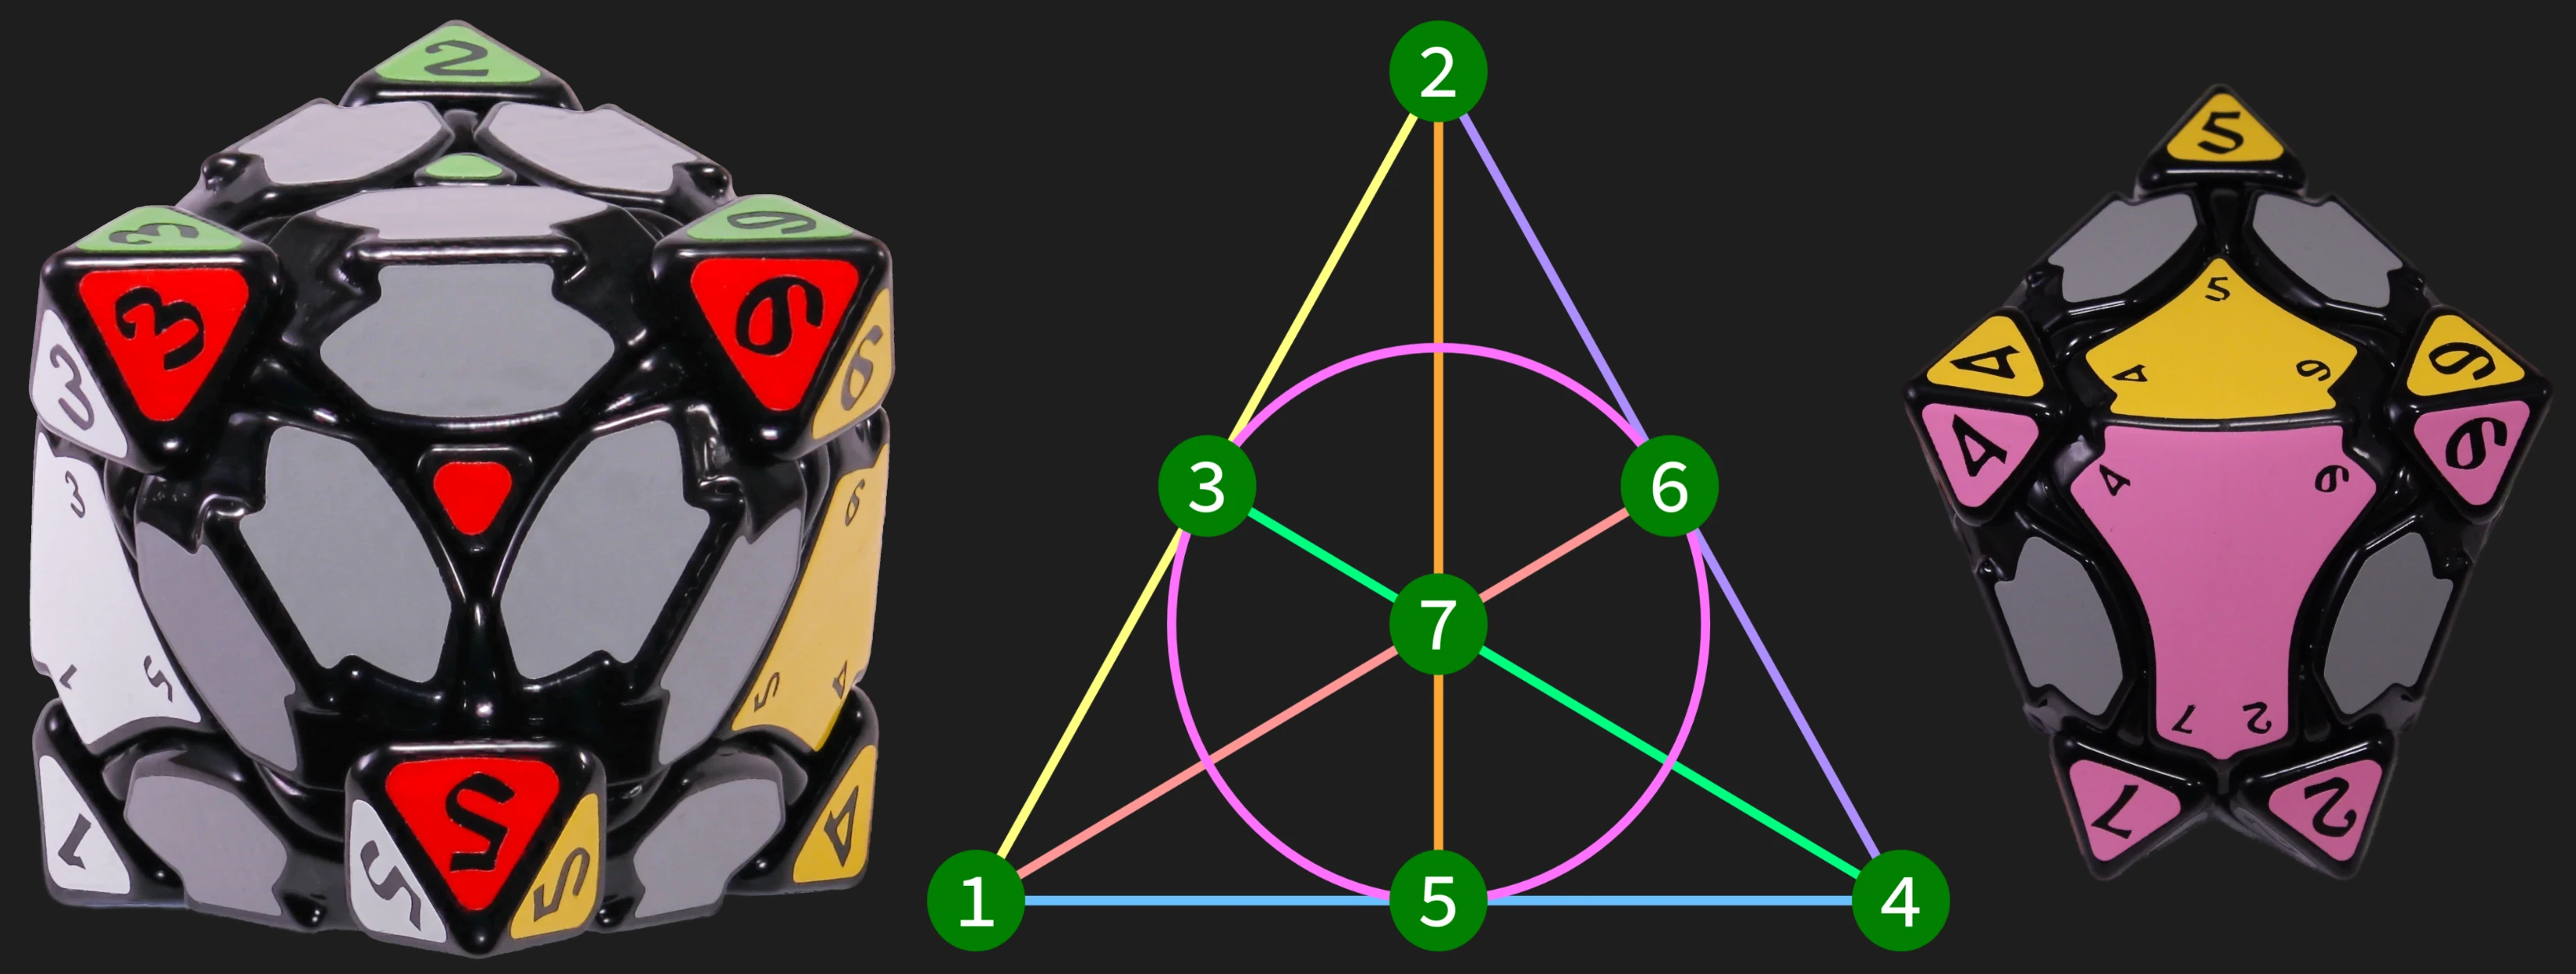
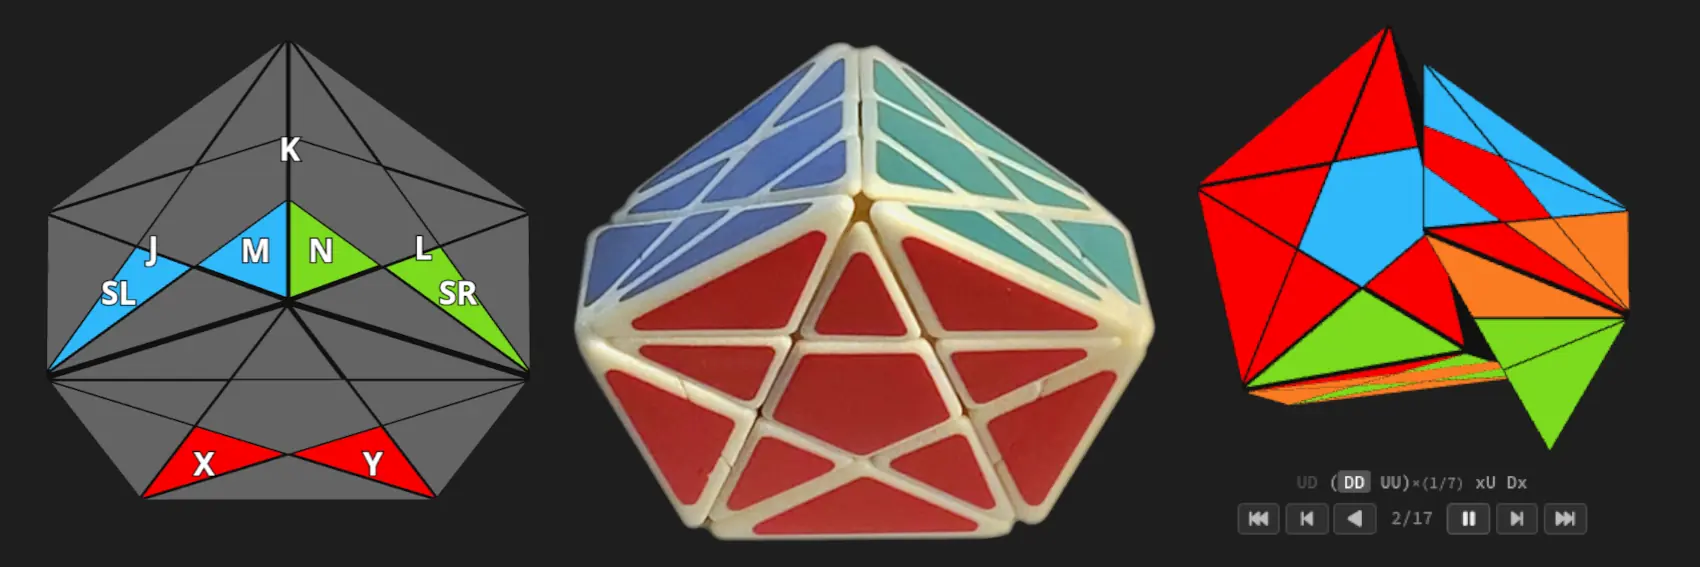
There are two identical 9-piece orbits of triangles. Pictured below is the ‘red orbit’ (X and Y pcs are red) with a name assigned to each piece.
X,Y— the pair of lower triangles on the front faceJ,K, andL— the three upper triangles on the back faceM,N— the middle triangles on the front of the top facesSL,SR(stage left and stage right) — the triangles borderingMandN
SL and SR are not a part of the critical 7-cycle sequences used in this solution and so are named differently than the rest.
Use your mouse or touchscreen to rotate the puzzle and memorize the orbit notation
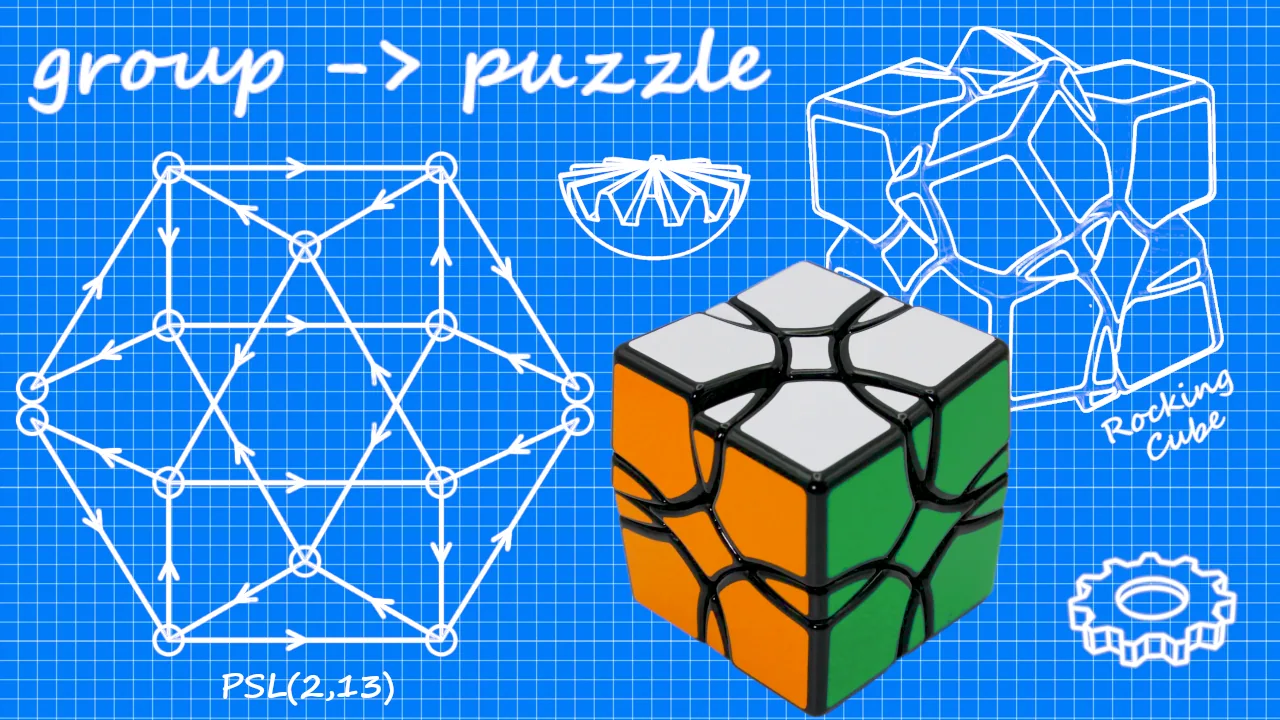
Useful Group Theory Background
The triangle orbits each express the automorphism group of PSL₂(8), often referred to as the exceptional twisted group Ree(3), but more simply stated as the indirect product PSL₂(8) ⋊ C₃. This group has 1512 elements (i.e. possible positions). The C₃ factor is shared between the two triangle orbits, the pentagons, and the 3-fold grips, which simplifies the solution quite a bit.
Whenever the grips have the same parity (i.e., are solved), each triangle orbit will only express one third of their possible states (1512 ÷ 3 = 504). This is analagous to the concept of even/odd parity in other Rubik’s cubes, except the Trapentrix has 3 possible parities. As usual, only one parity set contains the solved state. In group theory terms these parity sets are called cosets. The coset containing the solved state is the subgroup PSL₂(8) itself.
As such, it’s useful to stick to algorithms that preserve the grips and avoid venturing into the wrong cosets. The simplest operations in the PSL₂(8) subgroup, for solving purposes, are 7-cycles.
Identical Pieces
The most challenging part of this puzzle is the identical pieces. The restrictive nature of the PSL₂(8) group means that any incorrect placement of an identically colored piece will cause the rest of the pieces to be unsolvable. This solution is optimized to use quick ‘probing’ sequences to test if placements are correct.
Notation
Algorithms are written as pairs of moves — a left move followed by a right move. U for up and D for down. This is a bit unusual, but since sequences on this puzzle are essentially binary decisions, this notation is perfect for compressing them into memorizable mnemonics.
DD UU means left grip down (clk), right grip down (c-clk), then left grip up (c-clk), right grip up (clk).
An x in place of a D or U means to skip that grip. For example, xU means to ignore the left grip, then turn the right grip up (clk).
The notation is always applied left then right, based on the direction that the puzzle is facing — if you rotate the puzzle around 180° on the Y axis, the moves will now apply to the opposite orbit and grips.
Key Moves
UU DD (and DD UU) are fast dual 7-cycles that preserve the grips and leave exactly 4 other pieces alone. This solution focuses on first placing those 4 pieces correctly, using the fast dual 7-cycle sequence to simplify tedious trial-and-error before locking in a solution.
UU DD preserves the front orbit’s SL and SR pieces, and the back orbit’s J and L pieces. These are the pieces that will be solved in the initial steps.
Step-by-Step Solution
0. Solve grips
It’s important that the grips stay solved throughout the solution, except in steps 3-4 where they are intentionally rotated.
Rotate the grips into place so their colors match.
1. Solve SL and SR for red orbit
The orbits are interchangeable, but for clarity, this guide assumes we’re solving the red orbit first. We’ll position the red side of the grips to the front.
Repeat the sequence DD UU until either SL or SR contains a piece of the correct color. Then, to get the other into position, repeat DU UD (for SL) or xD UU Dx (for SR).
2. Identify mismatched pieces, switch out if necessary
Here’s the first tricky part. SL and SR now contain the correct colors, but either or both might contain the wrong piece of that color. We will probe to check which ones are correct.
Execute UU DD, the probing sequence, repeatedly up to 6 times. Stop when one of two things happens:
- (1 in 4 chance) All pieces in orbit are correct. You can move on to step 3.
- (3 in 4 chance)
JandLcontain the two red pieces (the ones that belong inXandY).
Putting the red pieces into J and L forced the orbit into one of 3 recognizable states.
Not only do we know that at least one of SL and SR contains the wrong piece, but we can also immediately tell which ones. Simply note the colors of the SL, M, N, and SR slots.
- If all except
Mappear correctly colored, thenSLneeds to be switched. - If all except
Nappear correctly colored, thenSRneeds to be switched. - If all four appear correct, then both
SLandSRneed to be switched.
These color signatures tell us the true locations of the actual SL and SR pieces. Use knowledge of the last step to correct them, or roughly follow these examples:
Now, if you’d like, execute UU DD repeatedly again to confirm that the red orbit is solvable. But there’s no need except for verification purposes. We need to put the red orbit on hold to set up the orange orbit.
3. Initial setup for orange orbit
Flip the puzzle around.
This orbit setup is different. Recall that the key move preserves different pairs of pieces on the back orbit vs. the front - now J and L will be staged to prepare for the next step.
Directly testing red pieces in J and L is impractical because there are 3 red pieces. So we’re instead going to put this orbit’s two orange pieces into J and L to disambiguate them (‘staging’), quickly solve the orbit into one of two symmetrical states, then execute an algorithm (‘unstaging’) to swap the colors.
If J and L both already contain orange pieces, skip to step 4.
If one or the other already contains one orange piece, you should first displace the staged orange piece with another, then solve the final orange piece (see example 2 below).
Important:
Both of the following algorithms must be used exactly once — one to solve J, the other to solve L. This will correctly position the grips for the next step.
3.1. Move Y into J
     UD UU Dx (238)

3.2. Move SL into L
     xU DD UD (702)
Before executing these, of course, use DD UU to shuffle an orange piece into SL or Y.
After both algorithms are executed, the grips will each be rotated clockwise. The next step will undo the rotation while solving orbit B.
4. Finish solving orange orbit
If you skipped step 3, execute algorithm 4.2 exactly twice, then proceed with this step.
Repeat DD UU until Stage Left, M, N, and Stage Right either appear solved, or appear flipped horizontally.
Now the magic happens — execute the appropriate algorithm:
4.1. Unstage and Untwist (no flip)
     DU DU DU UU DU DD DU DU DU (111 310 111)

4.2. Unstage, Untwist, and flip horizontally
     xU DU UD UD DU Dx (712 218)
5. Finish solving red orbit
Flip the puzzle around again. SL and SR are already staged, so all that remains to solve the red orbit is to eliminate one final 7-cycle.
This can again be solved by color signature. Identify the locations of pieces belonging to X and Y. For example, they might be in J and K. Look up the appropriate algorithm from this table and execute it.
5.0 - XY - Puzzle is already solved
5.1 - YN - Mirror of 5.6 (MX)
5.2 - NJ - UU DD UD DU UD DD UU DU UD DD UU DU
5.3 - JK - UD UD UU DD DU DU DD DU UD UU
5.4 - KL - Mirror of 5.3 (JK)
5.5 - LM - Mirror of 5.2 (NJ)
5.6 - MX - UD DD UD DD UU DU UD DU UU DU
In theory, you need only learn one algorithm and repeat it until the puzzle is solved. But learning 3 algorithms in conjunction with the lookup keys allows you to quickly solve all 7 cases.
6. Solve remaining pieces
6.1 - (DD UU)×7            - 3-cycle of front edges (c-clk), symmetric 2-2 swap of centers (+)
6.2 - (UU)×9               - 5-cycle of edges, left 2-2 swap of centers (\\)
6.3 - (UD)×9               - 5-cycle of edges
6.4 - [(UU)×4 DD (UD)×3]×2 - 3-cycle of left edges (c-clk)
The simplest way forward is to use conjugated forms of 6.1 to solve all of the remaining pieces. This can either be efficient or laborious depending on the state of the puzzle, but the sequence is easy to remember and quite quick to execute.
With some practice, the other sequences can be worked in for better efficiency. I will update this section with other useful sequences as they are discovered.
Algorithm Table / Codes
In addition to the U/D/x notation, I’m including encoded versions of the longer algorithms for memorization purposes. Numbers 0-3 are just binary representations of the moves, while 6-9 are exceptional single moves and rarely used.
DD(left down followed by right down)DUUDUU- Not used
- Not used
xD(skip left, right down)xU(skip left, right up)Dx(left down, skip right)Ux(left up, skip right)
To follow the binary code for an algorithm, convert each digit into the move pair and execute them sequentially.
I’ve included a few alternatives for some algorithms, so you can tab through them and find the one that works best for you.
| # | Algorithm | Notation | Binary Code |
|---|---|---|---|
| 3.1 | Move Y into J | UD UU Dx | (238) |
| 3.2 | Move SL into L | xU DD UD | (702) |
| 4.1 | Unstage/Untwist | DU DU DU UU DU DD DU DU DU | (111 310 111) |
| 4.2 | Unstage/Untwist/Flip | xU DU UD UD DU Dx | (712 218) |
| 5.1 | Solve YN | Mirror of 5.6 MX | |
| 5.2 | Solve NJ ▸ alternatives | UU DD UD DU UD DD UU DU UD DD UU DU | (3021 2031 2031) |
| 5.3 | Solve JK ▸ alternatives | UD UD UU DD DU DU DD DU UD UU | (22 30 11 0123) |
| 5.4 | Solve KL | Mirror of 5.3 JK | |
| 5.5 | Solve LM | Mirror of 5.2 NJ | |
| 5.6 | Solve MX ▸ alternatives | UD DD UD DD UU DU UD DU UU DU | (2020 31 21 31) |
The binary codes can be translated into words using the Mnemonic Major System for long-term memorization.
Chandler’s Personal Trapentrix Mnemonics
Room for Improvement
I suspect that a more optimal solution is possible, deviating after step 4, where the edges and pentagons are solved or partially solved before performing the 7-cycles, perhaps leaving the final grip orientation till the last step. That solution would eliminate the tedious, unpredictable nature of step 6, involving longer algorithms for step 5 that are harder to memorize. This could spawn an ‘advanced’ version that’s more suitable for speedcubing.
Simulator
Use the buttons to turn the puzzle, or click on the canvas and type notation pairs with your keyboard (such as Ux, DD, UD). The puzzle will wait for a pair to be typed before executing the moves. Press Escape or Backspace to cancel a pending move. Press f or the flip button to view the puzzle from the other side (this also inverts the notation accordingly).