This is a quick guide for digitizing pencil or ink drawings using a phone camera and GIMP. The goal is to produce a clean greyscale (or transparent) image from a hand-drawn original, suitable for printing or digital use.
1. Capture the Drawing
Use a phone to capture a photo of the drawing on a flat surface. Position the phone at least 18 inches above the drawing, with the camera lens centered over it and the phone perpendicular to the surface.

💡 Tip: It may be good to turn on the camera flash to ensure uniform lighting, but leave it off and use external lighting if it causes glare.
2. Import into GIMP
Import the image into GIMP. (This guide uses GIMP 3.2.)
💡 Tip: Use the Rotate and Handle Transform tools to square up the image if necessary.
https://www.gimp.org/downloads/
3. Crop the Image
Crop the image with the Crop tool, dragging over the area you want to keep, and press Enter to apply.

4. Clean Up the Background Edges
Remove any off-canvas background with the Eraser tool.
💡 Tip: Use the Hardness 100 brush with Size around 50 pixels. Make sure Opacity and Hardness are at their maximum.

5. Flatten to White
Set your background color to white and use Image → Flatten Image.

6. Extract a Single Color Channel
Use Colors → Components → Extract Component. Select either RGB Red, Green, or Blue from the dropdown list. Choose the channel with the least glare and best contrast. For pencil drawings, RGB Green usually works best.

7. Adjust Levels
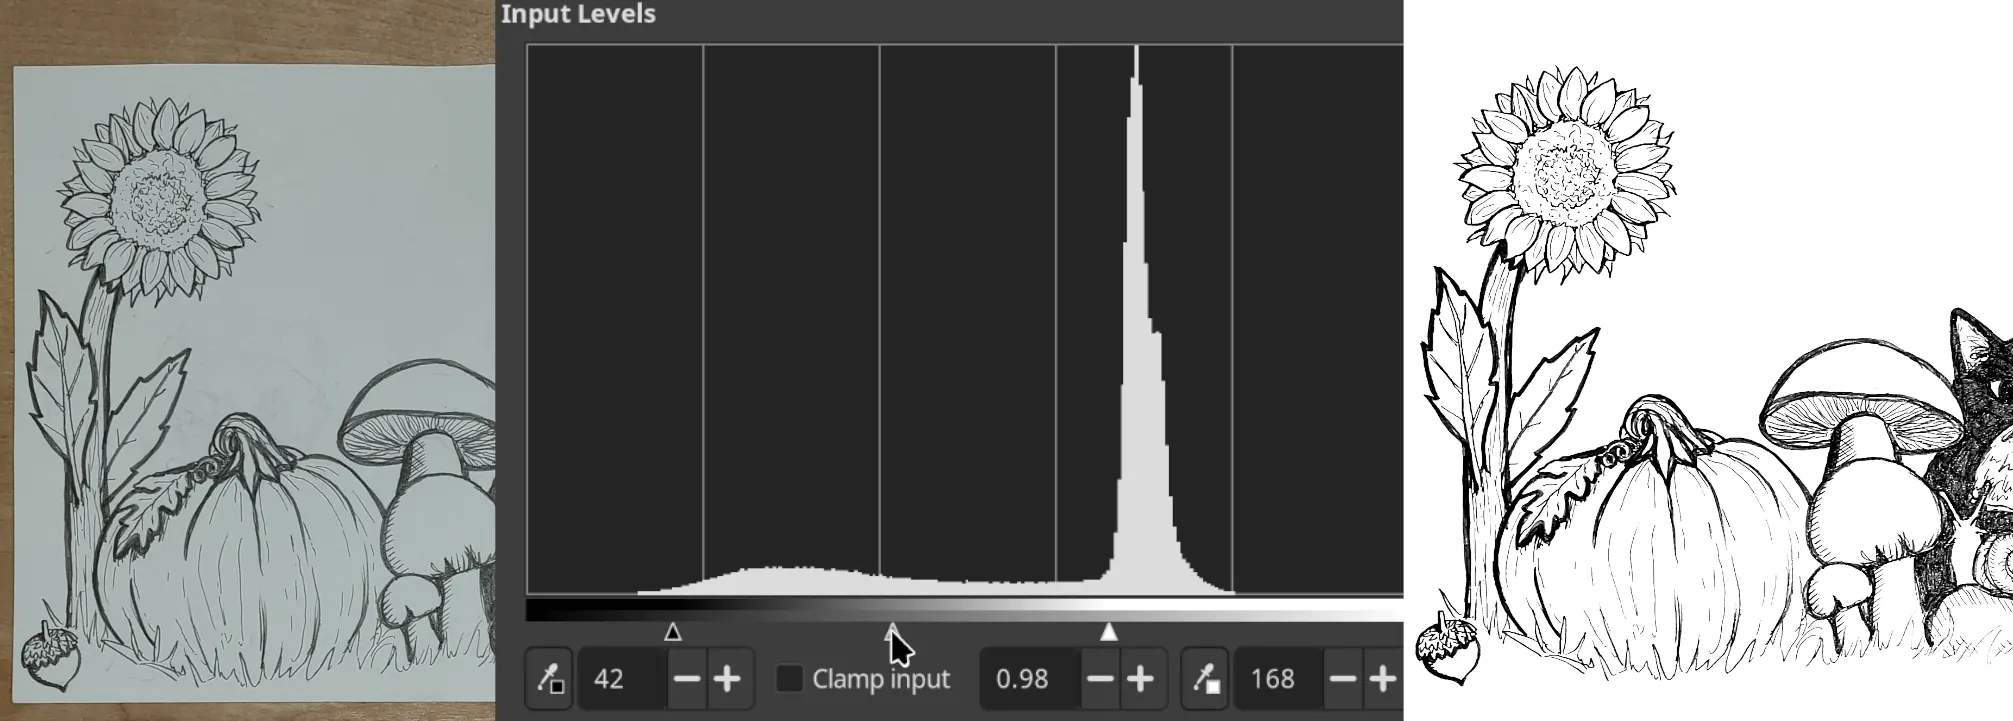
Use Colors → Levels to remove the background and dial in the contrast.
Step A — Identify the rightmost peak on the histogram. Drag the right (white point) slider so that it sits just to the left of that peak. This pushes the paper background to pure white.

Step B — Drag the left (black point) slider right until it begins to clip into the darkest lines on the histogram.

Step C — Adjust the middle (gamma) slider to find a nice contrast balance.

8. Fill Background with Red
Set your foreground color to red (ff0000) and use the Bucket Fill tool to fill the background. Ensure the Threshold value is between 0 and 6 before filling. A lower threshold will preserve more edge detail, while higher threshold helps to remove background artifacts.

💡 Tip: Before this step, doing an initial background removal pass with a feathered Fuzzy Select Tool might help if there are lots of artifacts.
9. Paint Over Unwanted Marks
Use the Paintbrush tool (also in red) to paint over any unwanted streaks or artifacts that are now clearly visible against the red background.

10. Extract Red Channel to Restore White
Use Colors → Components → Extract Component again, this time with RGB Red selected. This converts the red background back to white.

11. Optional — Transparent Background
Use Image → Flatten Image, then Colors → Color to Alpha to convert the white background to transparent.

You can now tweak the background color if desired, and export as a PNG or lossless WEBP file.